


Replacing Broken Deck Boards
If you have started to notice that a few of your deck boards are feeling a bit soft or starting to warp due to water damage or rot; you'll want to learn how to remove and replace old deck boards. Old deck boards with areas of curling or cracking are showing signs that the deck plank is no longer structurally sound.
Some decking materials, such as pressure-treated decking or Cedar deck boards, can dry and discolor without extensive maintenance needed. However, when deck boards are giving too much bounce when stepped on or are showing visible cracks or deck rot; replacing worn-down deck boards is necessary.
For many homeowners, replacing old decking can be a great opportunity to switch out old deck boards with long-lasting and durable composite decking or PVC decking. Composite decking (like Trex decking or TimberTech's PRO line) are crafted from recycled plastic particles and organic wood fibers then capped with a strong capstock. PVC deck boards (like the TimberTech AZEK line) are made of 100% synthetic materials for the best moisture and pest resistance. Both composite and PVC decking are considered low-maintenance decking options that set a deck up to last for years.

How to Replace Deck Boards
Step 1: Mark the Deck Boards to Be Replaced
Use a carpenter's pencil or a lumber crayon to note which of the old deck boards you'll be removing. There may be a lot of worn-down deck planks throughout the deck surface, and once you get to the point of actually lifting the boards off, you'll want to be certain that you have the right board.
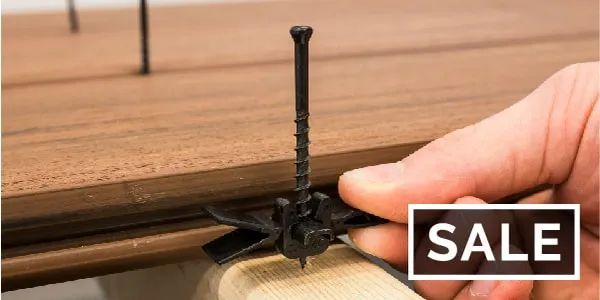
Step 2: Removing Nails, Screws, or Hidden Deck Fasteners
Remove deck fasteners attached to the damaged deck board using a pry bar, screwdriver or drill. If the decking fasteners can't be taken out, cut the board into pieces and remove the deck board in sections.
Step 3: Inspect Joists and Remove Rotted Portions
Inspect the joists underneath for signs of rot, age and water damage. Use a hammer and chisel to take off any rotted sections of joists. Repair and reinforce any joists that have soft, discolored areas using a wood putty.
Step 4: Apply Sealer and Joist Tape
Apply a thick coat of clear sealer to the damaged joist, let it dry, and then apply a second coat. Once fully cured, enhance the joist protection from future water-damage by applying a layer of deck joist tape along the top of the joist.
Step 5: Reinforce the Deck Joist
If necessary, cut and mount a reinforcing joist for increased support strength. Position the newly cut reinforcing joist tightly against the damaged joist and its neighboring joist or beam. Then attach the piece with galvanized structural deck screws driven tightly in place.
Step 6: Secure Reinforcing Joist
Attach the reinforcing deck joist to the ledger and header joist by toenailing with deck screws or structural hardware. Toenailing means driving your screw at roughly a 45-degree angle through the wood surface.
Step 7: Prepare Replacement Deck Board
Use a tape measure to find the specific length of the opening left in your deck surface and mark the deck plank to size. Cut new replacement deck boards from matching decking material, using a circular saw.
Step 8: Attach New Decking
Position the new decking and attach it to joists with galvanized deck screws or hidden deck fasteners. Measure the gapping between your current boards and make sure the gaps around your new board match the rest of the deck.
Now that you know how to remove old deck boards, switch to new composite decking to prevent this from happening in the future! Finding out how to remove broken deck boards is wonderful to know, but replacing rotten deck boards with durable composite decking can help you be a proactive deck owner for a more leisurely space to enjoy.